Friday, March 12, 2010

L'oreal HIP - Ready for Game Day!

Tonight I went to see my favorie hockey team, the Pittsburgh Penguins, play the New Jersey Devils in Newark. I haven't been to a see a game in about a year, so I was super excited about going again.

There are many different ways for people to show their team spirit...whether it be through wearing jerseys, temporary tattoos (or real ones, for that matter) and even painting their faces. Check out Pensburgh for the best Penguins hockey and fan news!

Today I not only wore my favorite player's jersey, but got my make up working too. No reason why tomboy's can't be pretty, too! By using L'oreal's High Intensity Pigment eyeshadows, I rocked my yellow and black, and showed my true team spirit!


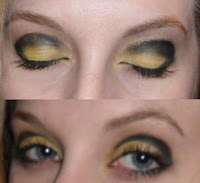
To get this look (or any other with deep pigmentation):

1. Start with a makeup base that will keep oils from festering on the skin and smudging intense colors. Cover with foundation or powder to set.

2. Use a Highlighting eyeshadow stick in a light pearl or flesh color (try Make Up For Ever's Pearly Waterproof Eyeshadow Pencil). This will help to keep the pigments sticking to your eye lid, not falling under your eyes or onto your cheeks. Cover the entire eyelid, up to the brow bone.

3. Apply lighter color eyeshadow with a regular eyeshadow brush to entire eyelid. Layer for desired intensity (I used L'oreal HIP's bright yellow in the eyeshadow duo 'Striking').

4. Use a lighter color (I used white for the yellow) just in the inside corner of the eyes. Blend with the first color to give depth to the eye.

5. Take your darker color (I used Make Up For Ever's Black eyeshadow) and apply to the crease of the eye, starting from the outside corner. I used my smudging brush to do this, as the bristles are shorter and it won't blend as much with the lighter color. Fill the outside corner, and bring 3/4 of the way to the inside corner of the eye. By leaving this little section open, your eyes appear larger. For a very dramatic look, bring to the inside corner. Bring slightly up on the corners of the eye.

6. Apply your liner to upper eyelid, as close as you can to your lashes, from inside corner to outside corner. I used my favorite Studio Gear cake eyeliner in black with my lining brush. Line the bottom lashes halfway to the corner of your eye (I line mine up with my pupil) and smudge out using the black eyeliner and your smudge brush.

7. Apply two coats of black mascara to top lashes. I applied one coat to my bottom lashes as well.

8. If your darker color is uneven on your eyes, you can always reshape using one of my favorite tricks: wet a q-tip, put some soap on it, and squeeze the excess water out. This can be used as an eraser for dark colors. (Be careful!) Once the cotton has the pigment on it you will need to either use another area of clean cotton or use the other side, otherwise it will put the pigment where you don't want it. Fix up your dark color to make both eyes look even.

9. Apply a shimmering highlighting powder (I used gold) with your fingertip right above where the dark color ends. Bring this up to your brow. This will lighten up your eyes and allow for perfect pictures!

You're ready for your close up!

Try these steps out and let me see how your bright, flashy colors come out!

And as always, Let's go Pens!

Wednesday, March 3, 2010

5 Favorite Beauty Tips!

Hope everyone had a great weekend!

Today I wanted to share some of my favorite beauty tips with my readers! These little steps and tid bits have helped me solve some of my beauty problems. Hopefully they can help you too!

1. ALWAYS WASH YOUR MAKEUP OFF AT NIGHT

This one is a given...something your mother has told you for years, and with just reason. Your skin repairs itself overnight, cell renewal is supercharged, and clogged pores can lead to disaster during this process. For you girlies lucky enough to not wear foundation or powder, you're not in the clear. Leaving eye makeup on overnight can lead to eye infections, styes and swollen corneas. It can even put excess strain on your eyelashes, making them fall out quicker and easier.

2. Don't skip the brush cleanings!

If you use makeup brushes...eye lining and shadow brushes, foundation and concealer brushes, even your favorite blush, bronzer and kabuki brushes, you NEED to keep them clean! Bacteria grows everywhere, and if you're grazing your brushes over your oily, skin treatment infused skin, nasty things can be born within them. This also includes sponges...use them once and throw them away! If you have acne or the occasional blemish, using a foundation or concealing brush can transfer acne from the blemishes into the brush, clogging pores in the future if they aren't cleaned. If you find it too much of a hassle to wash them after each use, don't stretch the wait out for more than a week.

There are tons of brush cleaners available, but if you're like me, I look for the simplest and cheapest way to get things done. Use dish detergent (some even have antibacterial in it) and warm water. Put a squirt of the soap in your palm, wet, and swirl the brush around until all the color comes out of the brushes. You will have to rewet and re-soap your hand a couple times, but it will get everything out. Make sure you rinse thoroughly though, there's nothing like Palmolive burning your eyeballs out to ruin your day...

3. Vaseline can be your best friend

There are tons of things that can go wrong with your skin. Dry, chapped lips, hands, facial skin, elbows...and Vaseline is often overlooked. This is usually my go to product for these types of problems. It's a miracle in a little plastic jar!

Nerves tend to make me bite my lips (very bad habit of mine) and no amount of lip gloss helps to fix the damage I've done. Globbing on the Vaseline at night allows me to wake up in the morning with perfectly smooth lips. Dry, cracked winter hands? Get a cheap pair of acrylic gloves. Cover your hands in Vaseline, and put the gloves on overnight. Wake up to perfectly smooth digits. Dry patches on other parts of your body? Slap on the Vaseline and cover the area with plasticwrap.

Another solution Vaseline has given me involves my deviated septum. Due to my nasal problems, I'm a mouth breather, leading to puffy gums which do not give a pretty smile. This is slightly repulsive to some, but putting Vaseline over your gums before bed can alleviate this problem. I've been doing it every night for quite some time, and I no longer wake up with puffy gums.

4. Don't overdo the bronzer!

Bronzer is not...I repeat...IS NOT...a compact powder you should put on your entire face. It was created to highlight and define your facial structure, and can be a handy tool if used right. If you are looking for a tanner complexion, try a self tanner, not your bronzer. It's important to find the right bronze color as well. Don't go for one with tons of shimmer in it; sometimes bronzers look more like eyeshadows than something you'd put on your cheeks. Try something more matte (I like Laura Gellar's Bronze and Brighten, or Tarte's Bronzing Powder) for a more natural look.

You should only use bronzer on the areas of your face the sun would naturally hit. Cheeks, chin, forehead. Bronze slightly below your cheekbones to add definition and narrow your face. Bronze the sides of your nose to make it look more narrow, or bronze down the middle to add width. As long as it's used right, bronzer can be a perfect tool. On the same note, go easy on the blush!

5. The Best Cosmetic Brushes Could Be From...Michael's?

Cosmetic brushes could range anywhere from $5 to $40, and this could do some damage on your wallet if you're buying a collection for all the different brushes you need (or would like to have). Some of my favorite brushes are from craft stores, and I couldn't be more satisfied with the results I've received from them. Think about it: artists want brushes that don't fray, stay soft and in place after washings, and are made from top quality materials. They may not have a brand name on them, and they may be a little longer, but they get the job done perfectly.

I've bought a angled wedge brush for an eyeliner brush, a big foundation brush, and a couple of different sized shadow brushes, all from craft stores. The big chains also offer 40% off coupons usually, so it can definitely work out to your benefit. Try it out!

Try some of these out and let me know how they work out for you! I know they've worked great for me throughout the years. Do you have any routines or secret beauty habits that help you feel or look even more amazing than you already do? What are they?

Studio Gear Cake Eyeliner - Perfect Lines Every Time!

Hi Friends!

Nothing makes me more aggrivated than getting my eyeshadow to look just right - fading each color perfectly into the next, and experimenting with new hues that lead to an awesome look. Then...it happens. I go to put my eye liner on and something horrible happens. I put my line on too thick. It doesn't come out dark enough, leading me to retrace my brush stroke, waste time and possibly smear. My dog barks out of nowhere and I draw a line halfway up my face (I'm too familiar with this one).

Cake eyeliner can help nip these problems in the butt. Similar to a eyeshadow, this product is designed to give the user ultimate control over how their liner goes on. When using this type of liner, it's always a good idea to wet your brush with water before applying the product to the brush. This will keep all bristles on your brush in place, minimize flakng and smudging, and allow for a cleaner line. Paired with a great angled liner brush, the lines you desire become easier to define, width is completely controlled, and it stays on all day!

Eyeliner sticks and pencils have their benefits, such as being able to get into the lid areas of the eyes to define your eye's shape, but they may not provide the thin, clean line you desire. I've experimented with many different types of cake and gel eyeliners, including MAC's black cake eyeliner and HIP Cosmetic's black cream eyeliner. Nothing seemed to get the job done. I felt I had to dig into the MAC cake to get anything onto my brush, and the HIP eyeliner disappeared from my face by the end of the day.

On a trip to ULTA recently, I picked up Studio Gear's Cake Eyeliner in black, and instantly fell in love. Studio Gear is a brand that is all encompassing. From skincare to primers, brushes and foundation - they have it all. It may not be the best known brand, but from my experience so far, they SHOULD be!

This cake eyeliner looked almost like a black shadow when I opened it, so I was afraid I'd have a bad experience like I'd had in the past...flaking off into my poor contact-irritated eyes throughout the day or coming out as a dark grey hue instead of black. I wet my brush, tapped out excess water, and swirled it around the pan. The powder quickly became a beautifully usable liquid, instantly making something inside of me become excited about applying.

Much to my surprise, my lines came out perfect on the first application. In the hopes for a very thin line, I pushed right up against my upper lash line with my favorite angled brush. The line was so thin I could barely see any excess on my eyelid at all. I applied my mascara, and my eyes truly popped! The nice, clean lines and uninterrupted eyeshadow I acheived was a fantasy for a perfectionist like myself.

If you're looking for a smudged or smoky eye, Studio Gear cake eyeliner can help you acheive this as well! The clean line I've mastered is now a staple of mine, even if I am trying to get a different look. After lining my eyes as usual, I simply take a smudging brush and apply either the cake eyeliner or black shadow to it, tap it out, and smudge away. The clean line that was acheived before smudging will stay in place over your lash line, no matter what you do over it. Also, getting such a dark color that close to your lash line will allow for perfect definition and make your lashes look thicker after mascara.

Cake eyeliner isn't used as much as I think it should be, and I can't figure out why that is. Even makeup artist friends and coworkers of mine stick with the sticks. I suggest you try it out, you have no idea what you're missing out on!

Studio Gear products are available from ULTA, Macy's and Dillard's. They can also be found on their website, StudioGear.

Have any questions about applying, choosing, or working with cake eyeliner? Let me know! Have you ever experimented with any types of liners other than sticks?

Monday, March 1, 2010

Payot Mousse Nettoyant - The Cleanser from the Gods!

Acne: such a touchy subject for those who have to deal with this problem on a daily basis.

My ability to work with my oily/combination and problematic skin has been a long, painful and embarrassing ordeal I've prayed would end quickly. My prayers went unanswered for about ten years, but about three months ago I started using Payot's Mousse Nettoyant.

I've used everything from Clinique to Proactiv, but nothing seemed to help my skin. I think part of the reason is because my skin is very sensitive and these products were too strong. Payot Paris flaunts the fact that they are biologically created, uses natural ingredients and was founded by Europe's first female doctor (go feminism!).

I've been told by many friends that are estheticians that it takes up to six weeks for your skin to adjust when using a new product, with optimum results coming after those six weeks. When your problem is acne, and it gets increasingly worse with hormones and stress, you want instant gratification. Payot's products made me feel like I was doing something good for my skin, not just trying to kill it so nothing could grow!


Mousse Nettoyant is a gel antibacterial cleanser which is soluble in water. Lots of Payot's other cleansers from their Demaquillantes (cleanser) line are for women on the go, no water needed. They also have eleven other lines designed for specific skin types and problems!

From the first time I washed my face with Mousse Nettoyant, my skin felt smoother and more hydrated. Taking a small amount of the gel (dime sized) and lathering is enough to cleanse my entire face and neck. After towel drying, my skin didn't feel tight and dry like it has in the past. I couldn't stop touching my face!


I've been using this product for about three months, along with it's sister products from the Purifiantes (oily skin) line: Tonique Purifante, a toner containing green tea to soothe the skin and prepare it for treatment products, Fluide Matifiante, a lightweight antibacterial emulsion I use in the morning, and Creme Purifiante, a rich antibacterial cream which I use before bed. My face has improved more than I could even imagine. Now, even the occasional blemish which occurs around that time of the month is easily handled!

Payot Paris flaunts itself on bringing the spa experience home to you for your personal use. While they are mostly sold in spas and upscale resorts, you can also find them online. Definitely don't pass this one up!

All of the products mentioned in this article, along with tons of other Payot products made specifically for different needs, are available from sites such as Skin 1 and Ariva Skincare.

Have you ever tried or heard of Payot products?

Pictures courtesy of Payot.

Modelco Face Base Skin Primer - Can't Live Without It!

Hope everyone's day was great!

Today I wanted to write about one of my favorite products EVER, something I cannot start my daily makeup routine without - Modelco Face Base Skin Primer. This silky, hydrating primer has been my go-to product for over a year, and I don't think I could ever be swayed away from it.

Modelco is a great cosmetic and self-tanning brand from Australia, who's products never cease to amaze me. Their Tan In A Can self tanner is a legendary product, and is available from places such as Henri Bendel and Ulta. I've worked for a distributor who sells Modelco in the United States for about a year, and Face Base has always been one of my favorites.

Face Base is oil free, contains vitamins C and E, and is a moisturizer all in one. It's clear formula allows even application, and a little bit goes a long way! This amazing gel fills in wrinkles and open pores, giving foundation a flawless face to glide over. Just rinse your face before application, wait two minutes for it to set before applying your makeup, and your beautiful face will look the same after a hard day's work (or long night of dancing) as it did when you first left your house.

I put this product over my entire face, eye lids, lips, and down under my chin. Face Base will keep bronzer on your cheeks, eyeshadow on your lids, and lipstick from bleeding onto your skin. I have very large, open pores around my nose and upper cheeks, and this primer keeps my foundation from sinking into those gaping holes.

I've had lots of problems with acne in the past, and I feel that using this product over my day cream, my skin has been almost completely breakout free. By creating a boundary between your open pores and your foundation/concealer, you have less of a chance of clogging them with dirt.

My favorite thing about Face Base, however, is how it keeps my eye makeup in place. I touch my face incessantly throughout the day, despite attempts to stop this horrible habit. I rub my eyes, itch my eyebrows, whatever my brain may ask of me, and I still seem to look great after a long day. Face Base even keeps my eye makeup on after working up a sweat in the gym!

Modelco products are available from Modelco USA. Face Base is 45 mL and runs for $34, and will last you about three months per bottle (depending on usage, of course).

Have you ever tried any Modelco products?

Image courtesy of Modelco USA.