Like many of you, I’m one of the millions of people that gets up every morning to go to my 9 – 5, leaving fun makeup and bright colors for weekends only. Well, this is just not enough for me to let my makeup freak flag fly, and I’m sure so many of you feel the same. So how do we express ourselves without our bosses thinking we’re psychos?
Unfortunately, you should leave the bright, neon or super dramatic eye shadows for the weekends. While you may think that your bright blue or green eye shadow is not distracting, it can be, and can also make you seem very unprofessional. Most of the people that visit my site won’t judge you on your expressive eye makeup, but others, who aren’t as into it as us, most likely will.
How do you show some color without covering the whole lid then? A smooth sweep of colored eyeliner can be all you need to brighten your look up. Pair this with some natural eye shadow and you’re set! To keep you look sleek and sexy, steer clear of pencils that can leave a harsh look. You can purchase great liquid eyeliners from Tarte or Makeup Forever – but I usually choose to use my wet/dry eye shadows. Not sure which color to pick to make your eyes stand out the most? Here are some tips:
Blue Eyes: Copper, Bronze, Brown, Eggplant
Green Eyes: Gold, Eggplant/Purple, Brown, Bronze
Brown Eyes: Blue, Eggplant/Purple, Burnt Orange
Hazel Eyes: Brown, Bronze, Copper, Gold, Eggplant/Purple
To emphasize the color on your eyeliner the most, stick with a simple and light color on your lids. I usually apply matte taupe across my entire lid, and then a slightly darker matte brown in my crease. Be sure to blend these well with a soft shading brush.
When applying your colored eyeliner, start with a very thin line (I use my angle brush to apply mine, but the applicator on your liquid eyeliner can work as well). If you are using liquid eyeliner, apply some mascara before, and be careful not to brush passed your lashes when applying – this can make your mascara look clumpy and make your eyelashes stick together. Wing it out for a cute retro look.
I always use black eyeliner on my waterline, even if I use colored eyeliner on top. This will further define the eye, especially if you’re using a lighter colored line on top. It’s your choice on whether or not you want to line the bottom waterline. I opt against it usually, bringing more attention to my sexy lids.
Last step – apply your mascara. I usually go with two or three coats, making sure I define each individual lash as best as possible. Be careful when applying. You don’t want to get any black residue on your lid by being sloppy with your mascara brush!
Finish with a simple lip and you’re set!
I’m sure you will have all of your coworkers jealous of your beauty…or, should I say, even MORE jealous!

Showing posts with label Cosmetics. Show all posts
Showing posts with label Cosmetics. Show all posts
Monday, May 23, 2011


Wednesday, January 12, 2011
Matching Your Makeup to Your Clothing - Is It A No Go?
Lately I've been concentrating a lot on my wardrobe, attempting to make myself look a little less sloppy than I have been in the past couple of years. I've bought things I never imagined I would wear, in colors I've never dared go near. I love wearing gray and black, which are great because you can do any makeup you want and it'll still work.
 So yesterday I was faced with a dilemma that I never really thought about before. I was wearing a green argile sweater: bright green with light green diamonds on it. Somehow the idea of wearing Being True's Malachite and Serpentine shadows (which both matched the colors in my sweater perfectly) seemed like a good idea. A little bell inside my head rang, however, and I decided to go with a neutral eye.
Somewhere, some time in my life, I was told not to match my shadow to my clothing. But why? Who the hell made this up, and why did I listen? While it may be a little ridiculous to match EVERYTHING on your face to your clothing, is it really that bad to match your shadow to your shirt? If I wore my green shadows with my sweater, would I be arrested by the makeup police?
I'd like to think I know a great deal about everything beauty, but somehow I can't decide if this is right or not. What do you guys think? Do you match your shadows to your shirt? Your lipstick? How much is too much?
Somewhere, some time in my life, I was told not to match my shadow to my clothing. But why? Who the hell made this up, and why did I listen? While it may be a little ridiculous to match EVERYTHING on your face to your clothing, is it really that bad to match your shadow to your shirt? If I wore my green shadows with my sweater, would I be arrested by the makeup police?
I'd like to think I know a great deal about everything beauty, but somehow I can't decide if this is right or not. What do you guys think? Do you match your shadows to your shirt? Your lipstick? How much is too much?
Tuesday, January 11, 2011
New Year - New Update!
Hey y'all!! I'm sorry I haven't written since Christmas, things have been so busy over here! I got a new 9 - 5, which I started January 3, and have been busy trying all my new toys that I got on Christmas. Thanks to my great family and boyfriend, my makeup collection has been expanded even further (not that it needed to be!)
First off, my brother bought me the Shakira perfume and body lotion set I've been dying for. It smells amazing! Hints of jasmine, vanilla and sandalwood fill your nostrils when you spray this beautifully light scent. My favorite thing about it? The adorable "S" bottle jewelry that keeps the sprayer closed when you're not using it. This makes Shakira's S an easy fragrance to travel with. I haven't stopped spraying since Christmas!
 My mother bought me a different Shany pallet with some great shadows in it. It encompasses a bajillion colors, so I can change it up everyday. Unfortunately, they aren't as bright and obnoxious as I would have hoped, but it'll help me subtly show off my skills and personality in my office! Beware: you need to use an all natural brush for these suckers or the color doesn't come out of the brush. Try a squirrel hair shadow brush for best results. I will be posting a tutorial soon using shadows from the pallet!
My mother also bought me an AMAZING brush set by Shany Cosmetics (one of my favs, if you couldn't tell) that has everything any human could possibly need in it. While I have a collection of great tried and true brushes, this set, complete with leather roll up case, will be perfect to use on clients. Since they all have their own little slot, it's easy to see which ones are missing so you don't forget anything!
And the grand finale...my love for my boyfriend exploded on Christmas day. After listening to me talk about makeup and tons of other stuff he doesn't give a crap about, he remembered the one thing I was dying for...the TEMPTU! This airbrush machine comes with airpods that easily switch out for perfect foundation, blush/bronzer and highlighter application. He bought me the complete set, which comes with two foundation pods (somehow he knew my color perfectly), a blush and highlighter that are picked out with the foundation you choose. My colors were Pale Pink and Champagne.

 For those of you who aren't informed about the Temptu airbrushing system, it's a great, user friendly way to apply airbrush foundation at home. The Temptu features 'pods' that have the nozzle built right in - a great and revolutionary idea that saves you tons of money and makeup. Unlike other airbrush foundation tools, this built in nozzle allows you to switch easily between products (or colors) without cleaning out the nozzle each time. This allows you to actually USE the makeup you buy.
First off, my brother bought me the Shakira perfume and body lotion set I've been dying for. It smells amazing! Hints of jasmine, vanilla and sandalwood fill your nostrils when you spray this beautifully light scent. My favorite thing about it? The adorable "S" bottle jewelry that keeps the sprayer closed when you're not using it. This makes Shakira's S an easy fragrance to travel with. I haven't stopped spraying since Christmas!

My mother also bought me an AMAZING brush set by Shany Cosmetics (one of my favs, if you couldn't tell) that has everything any human could possibly need in it. While I have a collection of great tried and true brushes, this set, complete with leather roll up case, will be perfect to use on clients. Since they all have their own little slot, it's easy to see which ones are missing so you don't forget anything!
And the grand finale...my love for my boyfriend exploded on Christmas day. After listening to me talk about makeup and tons of other stuff he doesn't give a crap about, he remembered the one thing I was dying for...the TEMPTU! This airbrush machine comes with airpods that easily switch out for perfect foundation, blush/bronzer and highlighter application. He bought me the complete set, which comes with two foundation pods (somehow he knew my color perfectly), a blush and highlighter that are picked out with the foundation you choose. My colors were Pale Pink and Champagne.

 For those of you who aren't informed about the Temptu airbrushing system, it's a great, user friendly way to apply airbrush foundation at home. The Temptu features 'pods' that have the nozzle built right in - a great and revolutionary idea that saves you tons of money and makeup. Unlike other airbrush foundation tools, this built in nozzle allows you to switch easily between products (or colors) without cleaning out the nozzle each time. This allows you to actually USE the makeup you buy.
 Currently, foundations ($55), blushes ($30) and highlighters ($35) are available for the system from Sephora, their own website and amazon.com. I've written to the company and was told that eyeshadows should be coming out for it around August (there goes all my money...)
I am absolutely in love with the Temptu. Although this won't be an everyday product (I dilly dally with it too much, no time for dilly dallying before work...) I use it every chance I get. No doubt this weekend my Temptu will be getting a great workout...this Saturday is my birthday! I want to rock perfect makeup and flawless skin from Friday to Sunday, and with the help of the Temptu I know people will be jealous of me. Tutorial will be coming soon!
Since I got the new job, I won't be able to update as much as I have been in the past. I will attempt to update as much as I can, and I will try to update every Saturday with video tutorials. Please give me suggestions on what you'd like to see!
Saturday, December 11, 2010
Sexy Purple Eye Makeup - A Different Smokey Eye
I've received a request on Facebook to show how to do a sexy smokey eye in either purple or black/grey...so I'm making this post to help a sista out! You will be surprised at how easy it is to apply these shades and to make this look work for you.
 This look is one I use all the time when applying my makeup, and you can tweak it slightly to make it a really sexy look for any party. You can use any colors that are similar, but in this tutorial I've used two MAC shadows, Shale and Beauty Marked. Purples often enhance all eye colors, but specifically green and blue eyes. I will also be using my Emani Minerals White Gold as a highlighting shade.
STEP 1: After applying primer, foundation and powder to your eyes, apply your lighter color (in my case, Shale) to the entire lid with a regular shadow brush. Make sure to get the inner most corner of your eyes, while dragging it slightly over the crease of your eyes. Apply your highlighting color to your brow bone all the way to where the contour color ends. Don't do any blending yet, and don't overlap your contour color, or you will have to darken it again.


STEP 3: Time to add in the extra sexy: Take the same shade you contoured with and drag it straight up to your brow (not INTO your brow!) on the inner corner of your eye. While a lot of looks call for the colors to be flared out on the outer corner of your eyes, I find that by bringing it up in the inner corners, your eyes look much deeper and sexier. It also keeps the darker color closer to your iris, which, if the color you choose compliments the color of your eye, will enhance much better than on the outside corner. It may look a little crazy when you first put this on, but we'll fix it with some great blending.

STEP 5: Now it's time for that blending. Use a soft eye contour brush with long bristles to make your colors mesh perfectly. First, start by going onto your lid and softening the color variation between your lid and the bottom of your crease. This blending doesnt have to be perfect, just enough to not leave a harsh look.
Take your soft contour brush and dip it lightly into your contouring shade. Work your brush into the inner corner of your eye in small circular or dabbing motions, softening the color and taking out some of the harshness. Move your way down the crease of your eye in dabbing motions with the same brush. If you find that the color is starting to lighten or come off too much, feel free to continue dipping in your contour shade while dabbing. The blending you do here will effect the finished look. Try to really 'smoke it up' with your contouring brush, being careful not to drag it much further than what you originally applied.

STEP 8: Apply your liner. You can either use a great liquid liner or smudge on a pencil liner. I use black and go for the liquid liner look, but you can use purple as well. As mentioned earlier, if you're looking for a really smokey look you will get better results with a pencil. Apply a great mascara and you're finished! If you want extra sexy lashes, apply some false eyelashes using my last tutorial!

Here's a video on how I've followed the steps listed. Don't mind my gaping mouth, I have a cold!
Wednesday, December 8, 2010
False Eyelash Tricks & Tips
Wednesday, the work week is almost over, everyone!

If you're going all out with some crazy falsies, I say you go all out. Go for extra long and thick, rhinestone banded, anything you think is extra awesome.
2. Throw Away the Applicator! The applicator that comes with some falshe lashes makes no sense to me. I've actually attempted to put lashes on with this applicator, and got so aggrivated I gave it up. Some people use tweezers, I use my good ol' fingers- it gives you the best control.
3. Apply ALL of Your Makeup First. Put your eyeshadow on exactly how you want it to look when your makeup is completely finished. When putting on your eye liner, I tend to put a little bit of a thicker line than usual, so you can make sure the strip of your lashes is completely covered. If you read the directions on the packaging of your lashes, it will usually say that you should apply your mascara after your lashes are on...I don't follow that rule. Put on your mascara first, so you can see exactly how your lashes will look when you're finished.
4. Check the size of the lashes. When you first take the lashes off the tray, wiggle the band around with both hands to get the strip ready to bend naturally onto your lash line. There will be a little adhesive on the lashes that kept it on the tray, use this now to push the strip onto your lash line to get the perfect size. It won't stay on your eye, but will give you a good idea as to whether or not you have to trim them.
If the lash strip is too long for your eye, you're going to have to cut them. Size them up on your eye and place your fingers at the exact point where your lash line ends. I usually don't have to cut my lashes, but if I did I would most likely cut from the inside, or the shortest lashes.
5. Give the Glue Time to Tack Up. One of the biggest mistakes you can make when applying false lashes is putting on the glue and sticking it right to your eye. It's not going to stick! You should wait up to a minute before attempting to put the lashes onto your lash line. Also, you only need a THIN strip of glue. Don't overdo it! This will lead to more excess on your eyelid and more drying time.
These are a few essential steps when applying your false lashes. Onto Application:
I start from the outside in. After your glue as gotten sticky (you can test this with your finger) push the end of the lash strip to the outside corner of your eye, as close to your lash line as possible but not ON your lash line. Since your glue has gotten tacky, you're not going to have to hold this section on as you move onto the rest of your eye.
Continue pushing the lashes onto your lash line using both hands. Keep your eye half closed; if you angle your face down slightly it can give you a better view of your lash line. Push the strip onto your lash line in little sections until you get into the inside corner of your eye. Once you're there, make sure you don't shove it into the corner of your eye.
Stop where your lashes end naturally (this should be simple since this is where you cut the lashes before to fit perfectly) and hold the corners on your eye for a couple of seconds. Keep your eye closed so you're not blinking and moving the strip around. Move onto your other eye and follow the same process.
Once you're finished, give your eyes a good look. Make sure there is no gap between your lash line and the lashes you applied. If you feel like you want your lashes to blend better, give them a couple of minutes to completely dry up and apply an extra coat of mascara.
Here is a video of how I apply my own lashes:
** The lashes I used were by Salon Perfect, #53.
I've received a request on Facebook from a reader who was asking me to tell some secrets about false eyelashes. False eyelashes are the one thing friends ask me most about, or ask me to do for them, since they can be trickly little suckers if you don't know how to apply them correctly. Here are a couple of tips I follow to apply strip falsies:
1. Pick the Right Style. There are tons of false eyelashes out there...expensive, inexpensive, crazy, natural, brown, black, separate and half-eye lashes...it can get confusing if you don't know which ones to pick for the look you're going for. When you get to your store of choice to purchase lashes, look at all available and imagine yourself wearing them.

If you pick ones that look full and voluptuous, beware: you may end up looking like a babydoll. If you pick ones that are too sparse, you may look like you're wearing nothing. My favorite ones for an every day look are from Walmart or Target and have a pattern of short and long lashes that will blend perfectly with your natural lashes. My favorite brands are Salon Perfect or Ardell Fashion.
If you're going all out with some crazy falsies, I say you go all out. Go for extra long and thick, rhinestone banded, anything you think is extra awesome.
2. Throw Away the Applicator! The applicator that comes with some falshe lashes makes no sense to me. I've actually attempted to put lashes on with this applicator, and got so aggrivated I gave it up. Some people use tweezers, I use my good ol' fingers- it gives you the best control.
3. Apply ALL of Your Makeup First. Put your eyeshadow on exactly how you want it to look when your makeup is completely finished. When putting on your eye liner, I tend to put a little bit of a thicker line than usual, so you can make sure the strip of your lashes is completely covered. If you read the directions on the packaging of your lashes, it will usually say that you should apply your mascara after your lashes are on...I don't follow that rule. Put on your mascara first, so you can see exactly how your lashes will look when you're finished.
4. Check the size of the lashes. When you first take the lashes off the tray, wiggle the band around with both hands to get the strip ready to bend naturally onto your lash line. There will be a little adhesive on the lashes that kept it on the tray, use this now to push the strip onto your lash line to get the perfect size. It won't stay on your eye, but will give you a good idea as to whether or not you have to trim them.
If the lash strip is too long for your eye, you're going to have to cut them. Size them up on your eye and place your fingers at the exact point where your lash line ends. I usually don't have to cut my lashes, but if I did I would most likely cut from the inside, or the shortest lashes.
5. Give the Glue Time to Tack Up. One of the biggest mistakes you can make when applying false lashes is putting on the glue and sticking it right to your eye. It's not going to stick! You should wait up to a minute before attempting to put the lashes onto your lash line. Also, you only need a THIN strip of glue. Don't overdo it! This will lead to more excess on your eyelid and more drying time.
These are a few essential steps when applying your false lashes. Onto Application:
I start from the outside in. After your glue as gotten sticky (you can test this with your finger) push the end of the lash strip to the outside corner of your eye, as close to your lash line as possible but not ON your lash line. Since your glue has gotten tacky, you're not going to have to hold this section on as you move onto the rest of your eye.
Continue pushing the lashes onto your lash line using both hands. Keep your eye half closed; if you angle your face down slightly it can give you a better view of your lash line. Push the strip onto your lash line in little sections until you get into the inside corner of your eye. Once you're there, make sure you don't shove it into the corner of your eye.
Stop where your lashes end naturally (this should be simple since this is where you cut the lashes before to fit perfectly) and hold the corners on your eye for a couple of seconds. Keep your eye closed so you're not blinking and moving the strip around. Move onto your other eye and follow the same process.
Once you're finished, give your eyes a good look. Make sure there is no gap between your lash line and the lashes you applied. If you feel like you want your lashes to blend better, give them a couple of minutes to completely dry up and apply an extra coat of mascara.
Here is a video of how I apply my own lashes:
** The lashes I used were by Salon Perfect, #53.
Monday, December 6, 2010
Super Shimmery Eyeshadow - Perfect Holiday Item?
Good Monday everyone! Happy Chanukah to all of you who celebrate, and I hope your festivities are going wonderfully. Luckily I got the rest of my holiday shopping done, so I don't have to step foot into a mall unless I decide to lose my sanity for a bit.
My family, boyfriend and I visited New York City and Rockefeller Center this Saturday to see the tree, and boy was it FRIGID! I did notice a couple of beauty trends as I was walking around and going into all the best cosmetic stores...two of which were neon pink blush (no bueno) and ridiculously shimmery eyeshadows.

First off, the blush I saw on some women as I was strolling the streets was slightly horrifying. Nothing is more frightening to me than hot pink or bright peach blush layered onto lovely faces. Please, NEVER, EVER apply more than just a slight hint of color to your cheeks. I'd love to give these women the benefit of the doubt and assume it was a combination of blush and bitter cold that gave them this baby doll look, but I don't think that's true...
Now, onto a trend I'm kind of falling in love with: super shimmery eye shadows. The Sephora home page for the month of December greets you with an adorable model who's eyes are bedazzled. Even when watching the NYC tree lighting on TV last week, the shimmery eye shadows were blowing my mind! So what are the pros and cons of this glittery shadow?
PROS:
- Feeling like a glam princess! Nothing screams glamorous more than bright, glittery shadows that make you look and feel like you're a diva.
- Catching everyone's attention. With eyes that capture the light and shine on, you will surely get everyone to check you out. And as long as you apply to your lid and slightly over your crease ONLY, it'll be for all the right reasons.
- Allowing your gorgeous face to get as much attention as your super sequined outfits. The big fashion trend right now is sequins on everything. Sequined dresses, sequined leggings, sequined sequins...how do you get people to look at your face when you're wearing clothes that make you look like a disco ball? Give your eyes a little sparkle and see how quick the attention goes to your pretty peepers.
- Shimmer everywhere! If you're not careful with your application, you can get glitter everywhere...your cheeks, your forehead, and if you're like me, even in your eyes. You have to be extra careful when applying these shimmery shadows, since they have bigger particles that can get into your eyes and actually scratch your corneas if you rub (this has happened to me, and take my word for it, it's horrible). Getting the shimmer on your cheeks and rest of your face is an easy fix, but getting it in your eyes, not so great. If you don't have a brush that holds your shadows tight during application, go for a cream or gel shadow that won't budge. One of my favorites? Sephora's Glitter Cream Eyeshadow. They have a set of four on sale now for $20!
- Not-so-great pictures. When your eyeshadow shines, great pictures could be a tricky thing to achieve. Think of that flash that blinds you after you take a picture, and imagine it reflecting right off your eyelids. It doesn't wind up so pretty. Holidays are a big time to get pictures with your loved ones, and you don't want to be the one asking for another picture every time that shutter goes off. How do you avoid this? Try to angle your face slightly down and look up into the picture to avoid getting too much of your glittery eyelid in the picture. You can also try to shut the flash off if it seems plausible.
- Over-Doing it. Nothing is worse than seeing someone with the same color eyeshadow up to their eyebrows. Same goes for these shadows. When you have extra glitter on your eyes, remember that you can stop slightly above the lid and get a great look. You don't necessarily need to blend different colors together or even use a contour color in your crease. Take it easy with these shadows and remember that fewer colors lead to better results.

Friday, December 3, 2010
Product Review: DuWop Lip Venom
Have you been trying to get those sexy, full, juicy looking lips, but haven't found any products to get you that look? Do you love super shiny lips but hate feeling like everything you pass will wind up stuck to your smoocher?
 I've tested out what seems like millions of lip plumpers and always find something wrong with them. Either the color is totally not what I expected, they don't actually do any 'plumping', or the opposite, they plump so much I feel my lips are going to burn off. It's hard to find a lip plumping product that's absolutely perfect, but I feel DuWop's Lip Venom ($16) is as close to perfect as possible!
The active ingredients that do the plumping are actually essential oils, so you don't have to worry about any drying agents like menthol. The tingle you feel is gentle- just enough to let you know its working. All the fine lines and any dry spots you'd have on your lips are filled out completely, and there is a visible change in your lips' fullness.
The only con I find about the product is that the little applicator brush is easy to drop...especially if you're applying somewhere where you can be bumped (i.e. a nightclub or bar). I wish it came with a great roller ball or a bigger wand.
I've been using Lip Venom on my lips for years. My lips are DEFINITELY not the biggest or the fullest, and on the days when I want to look a little extra sexy, this is always my go-to product! DuWop also has lots of other great products that I'd love to try soon!
What is your favorite lip plumping product?
 I've tested out what seems like millions of lip plumpers and always find something wrong with them. Either the color is totally not what I expected, they don't actually do any 'plumping', or the opposite, they plump so much I feel my lips are going to burn off. It's hard to find a lip plumping product that's absolutely perfect, but I feel DuWop's Lip Venom ($16) is as close to perfect as possible!
This lip plumper (also available at Sephora) gives your lips a great shine. Unlike most products that are extra shiny, this gloss is smooth and tack free, so you don't feel like you'll get stuck indefinitely to the next person you kiss.
Since Lip Venom clear, it can work with any other lip product. If you're looking to get the ultimate plumping effect, use a light coat of Lip Venom first, and follow up with the color of your choice. If you put on the color first, the plumping isn't as effective.
The only con I find about the product is that the little applicator brush is easy to drop...especially if you're applying somewhere where you can be bumped (i.e. a nightclub or bar). I wish it came with a great roller ball or a bigger wand.
I've been using Lip Venom on my lips for years. My lips are DEFINITELY not the biggest or the fullest, and on the days when I want to look a little extra sexy, this is always my go-to product! DuWop also has lots of other great products that I'd love to try soon!
What is your favorite lip plumping product?
Tuesday, November 23, 2010
Product Review: Maybelline Falsies Mascara
If you have five minutes, and only five minutes, to do your makeup in the morning, what would you put on? What are the products you can't live without?
Chances are mascara is one of your necessities in your beauty routine. Mascara brings out your eyes, draws attention to your face, and is sometimes all a woman needs to feel a little dolled up.
I've experimented with a ton of different mascaras from all different price ranges and brands. I've actually found a ton of the more expensive brands clump up on the brush, giving me gigantic tarantula lashes and flaking on my cheeks and eyeballs. Definitely not attractive.
 My favorite Maybelline Define-A-Lash may have to move over for the fabulous Maybelline Volum' Express Falsies...this stuff is rediculous. If you're looking for a mascara to give you length, volume and big, fat lashes, this is the one for you!
It comes in three colors (blackest black, very black and brown), and has a great curved brush that's bristles seem to catch and coat eyelashes you dont even know you have. It holds the perfect amount of product that doesn't coat lashes too much on the first coat, and doesnt allow for lashes to stick together.
I find that I got best results doing two to three thin coats on each eye...but be careful not to wait too long between applications. If you wait too long before applying your second coat, you will most likely get some flakes or clumps. After you put on your first thin coat, do your bottom lashes on the same eye and move right back up to the top. This will ensure you a well defined clump free look.
As for giving a false eyelash look? In my opinion, no amount of mascara is going to beat putting extra lashes onto your eyes. I think this mascara comes closer than any other I've tried in acheiving this. Want to amp it up? Try it on your own lashes along with false lashes to blow people away.
For $7.99 you can't beat the look you acheive with Maybelline's Volum' Express Falsies Mascara! And since it's a drugstore product, you may be able to get it on sale. What can be better than that!?
Chances are mascara is one of your necessities in your beauty routine. Mascara brings out your eyes, draws attention to your face, and is sometimes all a woman needs to feel a little dolled up.
I've experimented with a ton of different mascaras from all different price ranges and brands. I've actually found a ton of the more expensive brands clump up on the brush, giving me gigantic tarantula lashes and flaking on my cheeks and eyeballs. Definitely not attractive.
It comes in three colors (blackest black, very black and brown), and has a great curved brush that's bristles seem to catch and coat eyelashes you dont even know you have. It holds the perfect amount of product that doesn't coat lashes too much on the first coat, and doesnt allow for lashes to stick together.
I find that I got best results doing two to three thin coats on each eye...but be careful not to wait too long between applications. If you wait too long before applying your second coat, you will most likely get some flakes or clumps. After you put on your first thin coat, do your bottom lashes on the same eye and move right back up to the top. This will ensure you a well defined clump free look.
As for giving a false eyelash look? In my opinion, no amount of mascara is going to beat putting extra lashes onto your eyes. I think this mascara comes closer than any other I've tried in acheiving this. Want to amp it up? Try it on your own lashes along with false lashes to blow people away.
For $7.99 you can't beat the look you acheive with Maybelline's Volum' Express Falsies Mascara! And since it's a drugstore product, you may be able to get it on sale. What can be better than that!?
Monday, November 22, 2010
E.L.F. Waterproof Eyeliner Pen Product Review
Eyes Lips Face has finally come out with a product for those who are afraid of liquid eyeliner...the Waterproof Eyeliner Pen!
In making my traveling makeup kit, I researched a lot of different liquid eyeliners that I could carry around with me. I purchased the E.L.F. Waterproof Eyeliner Pens with my expectations low...after all, they are only $1.00. When I finally received my stuff from the mail, I was beyond excited to try the products. This weekend I got a chance to work on two models for a photo shoot, and couldn't wait to whip out these eyelining pens.
I purchased the plum, coffee and black eyelining pens. The pen itself is exactly the size of a regular pen, and the felt tip that applies the liner is stiff enough to create great lines, but soft enough to conform to the lines you try to form. Before applying to the models, I experimented with them to get an idea of how hard I would have to press and how quickly the fluid comes out. This eyelining pen has such versatility to it- I could make thin or thick lines, it moved very fluidly as I created swirls and points, and it didn't leave any wet puddles that would need to dry (that could get annoying). This was seriously like a makeup marker!
 When working on the models, I createrd a pink fade on one of them, and used the plum liner pen to create a sexy cat eye. I was SHOCKED at how easy it was to make them! And getting them to come out evenly thick and pointy? Piece of cake!
I was able to get extremely close to the lash line, the color was superb (not too light or too dark) and looked great with the colors I shaded onto her eyes.
The black Eyelining pen performed just as well as the plum (although the top of it was embarrassingly hard to get off...) and created a great liquid liner look to the other model.
If you don't feel comfortable with liquid liner, or have issues with getting the small brush or stiff felt tip pen to work for you, I definitely suggest you try E.L.F.'s Eyelining Pen in any of the five colors it comes in. For $1, you can't beat the quality of this liner. Also, Eyes Lips Face sends promotional coupons nonstop, definitely making their afforable cosmetics even more of a steal1 I am going to purchase the Midnight and Ash pens very soon!
What's your favorite eyelining product?
In making my traveling makeup kit, I researched a lot of different liquid eyeliners that I could carry around with me. I purchased the E.L.F. Waterproof Eyeliner Pens with my expectations low...after all, they are only $1.00. When I finally received my stuff from the mail, I was beyond excited to try the products. This weekend I got a chance to work on two models for a photo shoot, and couldn't wait to whip out these eyelining pens.
I purchased the plum, coffee and black eyelining pens. The pen itself is exactly the size of a regular pen, and the felt tip that applies the liner is stiff enough to create great lines, but soft enough to conform to the lines you try to form. Before applying to the models, I experimented with them to get an idea of how hard I would have to press and how quickly the fluid comes out. This eyelining pen has such versatility to it- I could make thin or thick lines, it moved very fluidly as I created swirls and points, and it didn't leave any wet puddles that would need to dry (that could get annoying). This was seriously like a makeup marker!

I was able to get extremely close to the lash line, the color was superb (not too light or too dark) and looked great with the colors I shaded onto her eyes.
The black Eyelining pen performed just as well as the plum (although the top of it was embarrassingly hard to get off...) and created a great liquid liner look to the other model.
If you don't feel comfortable with liquid liner, or have issues with getting the small brush or stiff felt tip pen to work for you, I definitely suggest you try E.L.F.'s Eyelining Pen in any of the five colors it comes in. For $1, you can't beat the quality of this liner. Also, Eyes Lips Face sends promotional coupons nonstop, definitely making their afforable cosmetics even more of a steal1 I am going to purchase the Midnight and Ash pens very soon!
What's your favorite eyelining product?
Sunday, November 21, 2010
Trends To Try For Thanksgiving
Thanksgiving is right around the corner...that means seeing family you haven't seen in a year, including your ever critical aunts and cousins who swear they know better than you and pick your style apart. How do you impress them this Thanksgiving and keep them quiet when they see your beautiful face?
There are a couple of big trends this Thanksgiving that you should stick with to ensure yourself a critic-free holiday season:
1. Bold Lips
I'm sure you've seen that bold lips are definitely the hot thing for winter. These striking lip colors in plums, browns and reds don't come without strings attached. The most important thing to remember about dark lip pigments (especially lipstick) is that they bleed into your skin. Be sure to line your lips with a similar color before applying a dark lip color. The wax in the lipliner will act as a barrier and keep your lipstick on your lips, not on your skin.
Don't work against your skin tone. Red is a pretty universal color for all shades of skin, but be careful when picking a plum or brown. If your skin is too pink, browns probably wouldn't be your best bet- stick with this if you have warm skin tones. Plum looks best on those with a cool complexion, so if you do have that rosy complexion, this will be your go to color.
Keep the eyes neutral if you wear a bright lip color. If you stick with the same color pallet, it usually works out great. If you're wearing a brown lip, stick with taupes and browns on your eyes. Plum lips would pair great with some smokey purples.
2. Blush Instead of Bronzer
 My biggest pet peeve is seeing women who look over-bronzed or super tan from October to March. Unless you went on an off-season vacation and your tan is REAL, I would tone the bronzer down. Nowadays it seems women forget about blush and use bronzer as the only tool to add color to their face. The best thing about winter is the adorable, natural rosy color most people get when it's cold out.
3. Practical Hairstyle
 Thanksgiving is most well known for is eating (duh) and if you're like me, the last thing you need is your hair in your face while you're attempting to chomp down.
If you have long hair and don't want to sport an every day ponytail, try a cute side braid that will keep hair out of your way while still looking adorable. Not into the side braid? Pull the front section of your hair on one side of your head back and accessorize by holding it back with a sweet hair broach (I'm all about the rhinestones).
If your hair isn't long enough to make a braid with, you can go with a simple elastic headband. It will do it's job of keeping your hair out of the way, and act as a great accessory to your outfit. A ton of stores are coming out with great headbands- I always find perfect headbands at Charlotte Russe or Target.
Thanksgiving is a holiday I like to keep comfortable. Showing your family how gorgeous you are is only part of the deal. Wear something cute and stylish, but remember you're probably going to want your after dinner nap! Jeggings or leggings and a nice flowy top is what's on my agenda to wear...nothing beats comfy stretch pants and a top to hide your full belly!
Are you planning anything special with your look for Thanksgiving? What will you be trying out?
There are a couple of big trends this Thanksgiving that you should stick with to ensure yourself a critic-free holiday season:
1. Bold Lips
I'm sure you've seen that bold lips are definitely the hot thing for winter. These striking lip colors in plums, browns and reds don't come without strings attached. The most important thing to remember about dark lip pigments (especially lipstick) is that they bleed into your skin. Be sure to line your lips with a similar color before applying a dark lip color. The wax in the lipliner will act as a barrier and keep your lipstick on your lips, not on your skin.
Don't work against your skin tone. Red is a pretty universal color for all shades of skin, but be careful when picking a plum or brown. If your skin is too pink, browns probably wouldn't be your best bet- stick with this if you have warm skin tones. Plum looks best on those with a cool complexion, so if you do have that rosy complexion, this will be your go to color.
Keep the eyes neutral if you wear a bright lip color. If you stick with the same color pallet, it usually works out great. If you're wearing a brown lip, stick with taupes and browns on your eyes. Plum lips would pair great with some smokey purples.
2. Blush Instead of Bronzer
 My biggest pet peeve is seeing women who look over-bronzed or super tan from October to March. Unless you went on an off-season vacation and your tan is REAL, I would tone the bronzer down. Nowadays it seems women forget about blush and use bronzer as the only tool to add color to their face. The best thing about winter is the adorable, natural rosy color most people get when it's cold out.
 Try a nice powder blush in a peachy or mauve color. Make sure to apply correctly: coat a big blush brush slightly into the compact, tap out any excess, and give a big smile. Apply to the apples of your cheeks, being careful not to get it onto your undereye area. Drag across with your brush towards your ears.
Blush will highlight your face very differently than bronzer does. By defining your cheek bones, your face will brighten up and glow. If you feel you can't live without your bronzer, apply a light dusting right under your blush. Be careful not to apply too dark, and your face will look fresh and bright!

If you have long hair and don't want to sport an every day ponytail, try a cute side braid that will keep hair out of your way while still looking adorable. Not into the side braid? Pull the front section of your hair on one side of your head back and accessorize by holding it back with a sweet hair broach (I'm all about the rhinestones).
If your hair isn't long enough to make a braid with, you can go with a simple elastic headband. It will do it's job of keeping your hair out of the way, and act as a great accessory to your outfit. A ton of stores are coming out with great headbands- I always find perfect headbands at Charlotte Russe or Target.
Thanksgiving is a holiday I like to keep comfortable. Showing your family how gorgeous you are is only part of the deal. Wear something cute and stylish, but remember you're probably going to want your after dinner nap! Jeggings or leggings and a nice flowy top is what's on my agenda to wear...nothing beats comfy stretch pants and a top to hide your full belly!
Are you planning anything special with your look for Thanksgiving? What will you be trying out?
Thursday, November 18, 2010
Brown Smokey Eye Tutorial
Hey Ladies! Today I will be sharing another picture tutorial on how to do a sexy brown smokey eye. Until I work out the lighting with my webcam for video tutorials, I will be loading picture tutorials- definitely more effective in my eyes.
You really only need two color eyeshadows, I will be using gold and brown, and I decided to use shimmer instead of matte today. My cake eyeliner will be put away for a black eyeliner stick, and of course, black mascara. It's important to remember that you will also need to line your waterline on both the top and bottom of your eyes (the water line is the inside brim of your eye) and to also line with your shadow on the bottom lash line as well. I will be doing this with a smudge brush, since I don't want the shadow to make me look like I have black eyes!
After applying your foundation and concealer to your eyes, shaping and coloring in any thin areas of your brows:
Step 1:
Line your eyes with your black eyeliner. I've used Being True's dual eye liner in 'Yin'. I smudged this into my top lash line, and lined my bottom lashes all the way to my tear duct. If your pencil is dull, it will give a better smudged look. After lining the outside, I pulled up my lashes and lined my upper water line. If you're having difficulty doing this, you can leave this step out, but it will definitely give you a more defined look. I carefully colored in my bottom lash line, and brought it as close to my tear duct as possible. By lining before applying your shadow, it will make the liner less pronounced while still defining your eyes.

Step 2:


Step 5:
Now that I've finished my blending and shading, The only thing left to do is clean up any shadow that has fallen onto my cheeks and apply some great thickening mascara. I used Prestige's My Biggest Lashes mascara. I used two coats on my top lashes, and used one coat on my bottom lashes. Finished look:

What do you think of the smokey eye look? Have you ever tried to do a smokey eye?
I've chosen to do brown today as a more natural alternative than a grey or black, but this can be done with any color you choose! Creating a smokey eye is very simple, and I feel women may just be afraid of the blending that is needed to create the 'smokiness'. You don't need expensive brushes to do the techniques I show, you just need soft bristled eyeshadow brushes. They will make it so much easier to blend and apply the color to your eye area.
You really only need two color eyeshadows, I will be using gold and brown, and I decided to use shimmer instead of matte today. My cake eyeliner will be put away for a black eyeliner stick, and of course, black mascara. It's important to remember that you will also need to line your waterline on both the top and bottom of your eyes (the water line is the inside brim of your eye) and to also line with your shadow on the bottom lash line as well. I will be doing this with a smudge brush, since I don't want the shadow to make me look like I have black eyes!
After applying your foundation and concealer to your eyes, shaping and coloring in any thin areas of your brows:
Step 1:
Line your eyes with your black eyeliner. I've used Being True's dual eye liner in 'Yin'. I smudged this into my top lash line, and lined my bottom lashes all the way to my tear duct. If your pencil is dull, it will give a better smudged look. After lining the outside, I pulled up my lashes and lined my upper water line. If you're having difficulty doing this, you can leave this step out, but it will definitely give you a more defined look. I carefully colored in my bottom lash line, and brought it as close to my tear duct as possible. By lining before applying your shadow, it will make the liner less pronounced while still defining your eyes.

Step 2:
Apply your highlighting color. I've used gold on my brow bone area and dragged it down all the way into the crease of my eye with my usual short bristled shading brush. This gold color is called Citrine and is also by Being True. If you're unsure where to stop the highlighting shadow at the ends of your eyes, color all the way to the ends of your eyebrows and come down in a diagonal line. Brush away any excess gold that may have fallen on your lid.

Step 3:
Brown shadow time. I applied a good amount of my dark brown shadow (Tarte's Brown Derby) from the lash line up by taking onto my brush and applying heavily. I brought this color all the way to the crease of my eye, being sure the shade is even throughout.

Step 4:
Now that I have both shadows on my eye, I need to drag the lighter application of brown up over my crease. I dragged the shadow from my lid over my crease with even, tapping brush strokes. By going from my lid to my brow bone, I'll bring the color from my lid to my lower brow bone area. Again, I started from the outside of my eye. I shaded the brown higher onto my brow bone on the outside of my eye and gradually brought it lower going inwards. I used a smudge brush to bring some of the Brown Derby shadow onto my lower lash line.

Step 5:
Now that I've finished my blending and shading, The only thing left to do is clean up any shadow that has fallen onto my cheeks and apply some great thickening mascara. I used Prestige's My Biggest Lashes mascara. I used two coats on my top lashes, and used one coat on my bottom lashes. Finished look:

What do you think of the smokey eye look? Have you ever tried to do a smokey eye?
Wednesday, November 10, 2010
Sunset Eyes - Picture Tutorial using Shany Cosmetics and Emani Mineral Eyeshadow

I decided to try something different with my eye makeup today, and wanted to go bright and bold. I purchased a pallet called Bold and Bright quite some time ago from Shany Cosmetics that has beautifully bright matte and shimmer eyeshadows, and I wanted to experiment with some of the off the wall colors. These shadows are AMAZING, the pallets are SO cheap, and the color payoff is the best I've found. When looking for matte, bright shadows, sometimes it's hard to find bright colors that come out on your brush as vibrant as they are in the pan, and these definitely do the job.
I decided to do a sunset inspired eye with y
 ellow, orange, red and purple. This pallet does have some white/off white shimmer colors, but I decided to use my Emani Minerals color dust in White Gold as a great highlighting shimmer for above my bright colors right up to my brow. I've had this color dust since I went to a networking event in New York City, but haven't had a chance to work it out. I applied this shimmer first with my soft eye contour brush to my brow bone area and the corner of my eye, and the sheen to it was fantastic. Surprisingly, unlike other mineral eyeshadows, it stayed ON my brush and didnt dust all over my face or eyelid. I love this mineral dust and can't wait to try it again!
 (Please don't mind my high-def camera showing you every single pore I have in these pictures!)
STEP 1 - After shaping my brows and applying my mineral dust in White Gold to my brow bone, it was time to start the bright color application. I've used regular clear tape on the edges of my eyes to keep a clean end line and avoid shadow dust on my cheeks. I started with a regular shadow brush with soft bristles, and applied yellow from the inner corner of my eye to the center of my eye lid. It's always easier to drag the color further than you intend to show, since it will be easier to blend a darker color over it rather than into it. I brought the yellow up slightly over my eyelid onto my brow bone to ensure all colors would be seen when my eyes were open all the way.

STEP 2 - Following the sunset theme, I chose a bright orange to take with the same shadow brush from right around where my iris starts to the edge of my eye. Again, I've dragged this across to the edge of my eye to blend easier for my next color. To blend into the yellow, I used my soft eye contour shadow brush and gently patted the colors that were already on my eye right where the two met. By not trying to apply and blend at the same time, the color with gradate together perfectly. I also dragged this orange up over my eye lid with my shadow brush a little higher than the yellow, and met the two with the same blending technique.
 STEP 3 - RED! I love red eye shadow for some reason, and love how it contrasts against my blue eyes. I started applying the red from the outer edge of my iris to the end of the eye. I dragged this higher than the orange onto my brow bone area, and used the same patting technique with my soft eye contour brush to blend the orange and red together.
STEP 4 - I could have stopped right here and left the eye like this, but when I think of sunsets I always think of the magentas and purples that go high into the sky when the sun is going down. I decided to blend some purple onto the ends of my eyes. With the tape placed at the edges of my eyes, I guaranteed myself a sharp edge to my shadow application. I put purple halfway into the red shadow I applied all the way to the edge of the tape. I blended this slightly lower than the red to give my eyes a great, open shape.

After all of the shadows were applied, I pulled the tape off the ends of my eyes, and applied my liner. I tried to keep it clean and tight to my lash line, attempting to draw no attention to anything but the beautiful colors. I used my regular Maybelline mascara and got final results that I fell in love with!

Let me know what you think of the new look I tried! Have you tried Shany Cosmetics or Emani Minerals? What did you think of them?
Monday, November 8, 2010
Revlon Photo Ready Foundation

One of my least favorite things about makeup is foundation. Since I do have such reactive skin, I'm always afraid to try something new or attempt to change my routine once I find something that works. I couldn't ignore the appeal of Revlon's Photo Ready liquid foundation, and purchased it in 'Nude' this weekend despite my fear of breakouts.
I love foundations with a pump, so the pump on this bottle was a relief. I first smeared and blended into the inside of my wrist to get an idea of texture, how much it spreads (or worse, CAKES!) and to approximate how much to put onto my face. The coverage was great, and I was surprised to see the slight shimmer to the dried foundation. I've always been turned off by the shimmer of mineral makeup, but the shimmer of this was so subtle that it wasn't that bothersome. It also has absolutely NO scent to it, which was promising for my blemish-prone skin.
It took about a pump and a half to cover my entire face, and I was surprised to feel how light this foundation actually was. I applied in dabs to my entire face with my foundation brush. The sparkle in the foundation was slightly overpowering for myself, since I am used to a more matte finish. I think I may attempt to put my concealer on BEFORE this foundation next time I use it, since the matte finish to the concealer and the dewey look from the foundation didn't mesh too well.
Surprisingly, I didn't need much concealer at all. I used some under my eyes and a little on some small blemishes I had on my cheek. Photo Ready covered my slight acne scarring very well, and neutralized all uneven coloring.
After applying foundation and concealer, I applied a light dusting of loose powder. I didn't like the way my skin looked with just the loose powder, so I applied pressed powder with a cosmetic sponge, and it looked phenomenal.
Throughout the day, the foundation stayed on very well. I didn't do any touchups, I didn't have any oily shine. When I washed my face last night, I saw that it did stay flawless for over 14-15 hours of wear.
Overall, I think Photo Ready was a great foundation that I definitely will continue to use. The shine was a bit much for me to handle, but it may be because I am so used to mattifying products. The color match and coverage were perfect, and for the price of $10, I'm pretty sure I will buy it again!
What is your favorite drugstore foundation? Have you ever tried Photo Ready?
Picture taken from www.revlon.com
Friday, November 5, 2010
First Makeup Tutorial - Natural Eyes
As promised, here's my first tutorial on how to do a natural eye with brown shades. I know it's not perfect, and it was impossible for me to pick up that crazy shaped pallete I had. Since you may not be able to see the colors I picked on the brushes, I've posted a picture of the pallet with the colors I've used on this eye. I've also posted some pictures on how the eye looks finished. Please give me some feedback, since this is my first tutorial! I'm open to any suggestions!
Pallete Image:

Open:
 Closed:

Pallete Image:

Open:
 Closed:
Thursday, May 20, 2010
All Over Care for Summer
Summer's right around the corner, and it's important to think of how this will effect your beauty routine. There are many different aspects of your winterized beauty routine that will need to be changed to survive the sweltering heat! Check these beauty tips out:
HAIR
Easy on the Sun-In!
- Although everyone wants those sun-kissed strands to shine throughout the summer, sprays like this can dramatically change your hair's health. Although there are hair lightening ingredients in these types of sprays, there are also agents that can dry out ends and create a ton of frizz. Also, be careful with salt water and chlorinated pool water. These can dry you out super fast! Want your hair's shine back after going overboard with any of these? Try a hot oil treatment like VO5's Moisturizing Hot Oil which you can get for under $5, or a hair mask like Perlier's Mediterranean Hair Mask for $18.50 if you want to splurge.
Don't forget your usual conditioning!
- While I am used to skipping a conditioning or two every time I wash my hair, it's important to keep your hair moisturized throughout the summer.
Hair Ties...
- These can become your worst enemy! It's a well known fact that hair ties lead to premature breaking and damage to the hair, and with the heat and humidity the summer brings, tying up your hair is often the only thing a woman can do to keep a little cooler. Try clips or headbands to keep the hair off of your face and ears (uncovering those ears will actually help drop your body temperature dramatically!) or go my route...chop it off!
SKIN
DON'T GO ANYWHERE WITHOUT SUNSCREEN!
- As I'm sure all of you know from every single beauty, health and skincare article ever written, sunscreen can be the most important thing you put into your beauty regimen, especially in the summer. The repercussions of just one sunburn can be severe enough to put you at risk for skin cancer, future age/brown spots, and premature aging. Not only is red skin damaging to your health, it's also painful...and very unattractive! Have acne prone skin and you're afraid to put sunblock on your face? Try a mineral foundation. These often have a minimum of SPF 15protection, and can make all the difference in your skin's defence against the sun's harmful rays. Had a bad sun experience? Don't forget how effective and repairing goold ol' aloe is- I never travel without it!
Switch out those heavy moisturizers.
- Winter calls for heavy moisturization and protection against the dry cold, but moisturization in the summer is often a little easier. Heavy creams in the summer can often lead to breakouts on your face and body. Know how you get super oily on a hot day? Think of that oil, sweat and thick cream all sitting on your skin festering...yuck! Try a fluide or emulsion to moisturize your face- this lighter moisturization can make all the difference between a beautiful skincare week and an oil slick on your face.
Want to moisturize your body? Try a dry oil or emulsion here as well. It won't leave you feeling sticky, and some leave your skin with a beautiful sheen that glistens in the summer sun. Want a body oil to try? Check out Payot's Huile Precieuse Minerale or Pevonia's Botanical Dry Oil.
Stay Hydrated...on the inside
- Drink plenty of water to stay breakout free. Frozen margaritas and strawberry daiquiris are delicious, but alcohol does NOTHING good for your skin! Plus, it dehydrates you and can make you look super bloated in your teeny weeny bikini...yuck!
Control your Shine
- Getting extra oily on your face and don't want your makeup to smudge? Try some rice paper or blotting paper. It works wonders and is usually pretty cheap!
MAKEUP
Prime, Prime, Prime
- Primer can be your best friend, especially in the summer. This can make all the difference in your makeup staying on your face on warm days. It's not just helpful with your foundation, but also your eyeshadow. Make sure you prime your whole face every day!
Try Something New!
- A good friend in the industry just told me about Urban Decay's new temperature sensitive line that keeps makeup set in the heat. Keep your eyes peeled for this one...it's going to be awesome!
Chill with the Powder
- Shine is sometimes hard to control, and powder seems to be the favorite weapon of choice against this demon. Try some shine control powder like Laura Mercier's Smooth Focus Pressed Setting Powder. It will work wonders!
Have any summer tips that can help readers? Let me hear 'em!
HAIR
Easy on the Sun-In!
- Although everyone wants those sun-kissed strands to shine throughout the summer, sprays like this can dramatically change your hair's health. Although there are hair lightening ingredients in these types of sprays, there are also agents that can dry out ends and create a ton of frizz. Also, be careful with salt water and chlorinated pool water. These can dry you out super fast! Want your hair's shine back after going overboard with any of these? Try a hot oil treatment like VO5's Moisturizing Hot Oil which you can get for under $5, or a hair mask like Perlier's Mediterranean Hair Mask for $18.50 if you want to splurge.
Don't forget your usual conditioning!
- While I am used to skipping a conditioning or two every time I wash my hair, it's important to keep your hair moisturized throughout the summer.
Hair Ties...
- These can become your worst enemy! It's a well known fact that hair ties lead to premature breaking and damage to the hair, and with the heat and humidity the summer brings, tying up your hair is often the only thing a woman can do to keep a little cooler. Try clips or headbands to keep the hair off of your face and ears (uncovering those ears will actually help drop your body temperature dramatically!) or go my route...chop it off!
SKIN
DON'T GO ANYWHERE WITHOUT SUNSCREEN!
- As I'm sure all of you know from every single beauty, health and skincare article ever written, sunscreen can be the most important thing you put into your beauty regimen, especially in the summer. The repercussions of just one sunburn can be severe enough to put you at risk for skin cancer, future age/brown spots, and premature aging. Not only is red skin damaging to your health, it's also painful...and very unattractive! Have acne prone skin and you're afraid to put sunblock on your face? Try a mineral foundation. These often have a minimum of SPF 15protection, and can make all the difference in your skin's defence against the sun's harmful rays. Had a bad sun experience? Don't forget how effective and repairing goold ol' aloe is- I never travel without it!
Switch out those heavy moisturizers.
- Winter calls for heavy moisturization and protection against the dry cold, but moisturization in the summer is often a little easier. Heavy creams in the summer can often lead to breakouts on your face and body. Know how you get super oily on a hot day? Think of that oil, sweat and thick cream all sitting on your skin festering...yuck! Try a fluide or emulsion to moisturize your face- this lighter moisturization can make all the difference between a beautiful skincare week and an oil slick on your face.
Want to moisturize your body? Try a dry oil or emulsion here as well. It won't leave you feeling sticky, and some leave your skin with a beautiful sheen that glistens in the summer sun. Want a body oil to try? Check out Payot's Huile Precieuse Minerale or Pevonia's Botanical Dry Oil.
Stay Hydrated...on the inside
- Drink plenty of water to stay breakout free. Frozen margaritas and strawberry daiquiris are delicious, but alcohol does NOTHING good for your skin! Plus, it dehydrates you and can make you look super bloated in your teeny weeny bikini...yuck!
Control your Shine
- Getting extra oily on your face and don't want your makeup to smudge? Try some rice paper or blotting paper. It works wonders and is usually pretty cheap!
MAKEUP
Prime, Prime, Prime
- Primer can be your best friend, especially in the summer. This can make all the difference in your makeup staying on your face on warm days. It's not just helpful with your foundation, but also your eyeshadow. Make sure you prime your whole face every day!
Try Something New!
- A good friend in the industry just told me about Urban Decay's new temperature sensitive line that keeps makeup set in the heat. Keep your eyes peeled for this one...it's going to be awesome!
Chill with the Powder
- Shine is sometimes hard to control, and powder seems to be the favorite weapon of choice against this demon. Try some shine control powder like Laura Mercier's Smooth Focus Pressed Setting Powder. It will work wonders!
Have any summer tips that can help readers? Let me hear 'em!
Tuesday, May 11, 2010
Maybelline Lash Stiletto Mascara
So I've always been a huge fan of mascara...anything that could make my lashes longer and fuller is great in my book. I've heard of lots of people having problems with their contacts and eye makeup (I wear contacts 24/7) but have never had issues with anything until I tried Lash Stiletto mascara from Maybelline.
While the appeal of the long, separated, shiny lashes that are promised from Maybelline is very appealing, the results for me were sub par. After applying, my lashes looked as they always do when I wear mascara - long, separated and black. I finished my face, and went out for the night.
All night, I was having trouble seeing - blurriness, extra tears...and an insatiable ITCH that wouldn't go away. I went home, ran to take out my contacts, and saw how RED my eyes had become. My lids were swollen, and my eyes were more bloodshot than I had ever seen them. I quickly rinsed off my makeup and put warm compresses on my eyes to get rid of the sting.
The next morning, I couldn't even get my contacts in. They were still red, swollen and itchy. I actually had to wear my glasses for about 5 days...REDICULOUS!
I actually gave this mascara another try (why, I'm not quite sure...) thinking it was just the batch and bought a new tube and had the same reaction. I gave it to my mother, and she too had a horrible reaction to it!
Maybelline Lash Stiletto is now on my nix list forever!
I do, however, love Maybelline's Define-A-Lash mascara and use it daily. If you're going to try a drugstore brand of mascara, this is the one to get!
What's your favorite mascara? Have you ever had a bad reaction to anything?
Thursday, April 29, 2010
being TRUE - Mineral Foundation That's Truly Amazing!
Foundation has always been something that was difficult for me to buy - a combination of very reactive, acne prone skin, being pale and having to worry about covering acne scars, makes it hard for me to find a foundation that is good for me.
Loose powder mineral foundation has also been something I tend to overlook, thinking that the coverage wouldn't work well enough for my spotty skin. When I received two different mineral foundations, a bronzer, foundation brush and sponge, and a mineral spray from Being TRUE in a great kit, cleverly named...'the kit'...I was skeptical of how well it would work for me.
I just recently tried this mineral powder over my regular foundation (I stick with Physician's Formula Talc Free Mineral Liquid Foundation as a base) I was quite surprised by how well it went on. Usually with mineral foundations, I've had problems with the application. The powder either comes out too strong, or on the other hand, looks like I put nothing on at all. Other times, it's so sparkly I look like I doused my face in really cheap bronzer. Not the case with Being TRUE's foundation.
The powder is velvet like, and coats the brush they give with the kit perfectly. After tapping on the cap, I was surprised to see how much of the powder still stayed in the brush. Reluctantly, I applied to my entire face and was astonished to see my skin mattified. I continued to apply foundation, and moved to the bronzer that came with the kit. This stuff made my skin look great!
I read up on the mineral mist, which is supposed to set makeup and leave a natural finish. I've never been a big fan of sprays that make you look 'natural', so I skipped this for now. I kind of wanted to see how well the foundations would stay on without it, anyway!
At the end of the day everything stayed on pretty well, and the minerals didn't cake or set in any smile spots or forehead scowls.
How do you feel about mineral foundations? Have you had any good or bad experiences?
Loose powder mineral foundation has also been something I tend to overlook, thinking that the coverage wouldn't work well enough for my spotty skin. When I received two different mineral foundations, a bronzer, foundation brush and sponge, and a mineral spray from Being TRUE in a great kit, cleverly named...'the kit'...I was skeptical of how well it would work for me.
I just recently tried this mineral powder over my regular foundation (I stick with Physician's Formula Talc Free Mineral Liquid Foundation as a base) I was quite surprised by how well it went on. Usually with mineral foundations, I've had problems with the application. The powder either comes out too strong, or on the other hand, looks like I put nothing on at all. Other times, it's so sparkly I look like I doused my face in really cheap bronzer. Not the case with Being TRUE's foundation.
The powder is velvet like, and coats the brush they give with the kit perfectly. After tapping on the cap, I was surprised to see how much of the powder still stayed in the brush. Reluctantly, I applied to my entire face and was astonished to see my skin mattified. I continued to apply foundation, and moved to the bronzer that came with the kit. This stuff made my skin look great!
I read up on the mineral mist, which is supposed to set makeup and leave a natural finish. I've never been a big fan of sprays that make you look 'natural', so I skipped this for now. I kind of wanted to see how well the foundations would stay on without it, anyway!
At the end of the day everything stayed on pretty well, and the minerals didn't cake or set in any smile spots or forehead scowls.
How do you feel about mineral foundations? Have you had any good or bad experiences?
Friday, March 12, 2010
L'oreal HIP - Ready for Game Day!
Tonight I went to see my favorie hockey team, the Pittsburgh Penguins, play the New Jersey Devils in Newark. I haven't been to a see a game in about a year, so I was super excited about going again.
There are many different ways for people to show their team spirit...whether it be through wearing jerseys, temporary tattoos (or real ones, for that matter) and even painting their faces. Check out Pensburgh for the best Penguins hockey and fan news!
Today I not only wore my favorite player's jersey, but got my make up working too. No reason why tomboy's can't be pretty, too! By using L'oreal's High Intensity Pigment eyeshadows, I rocked my yellow and black, and showed my true team spirit!
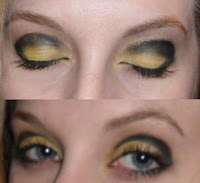
To get this look (or any other with deep pigmentation):
1. Start with a makeup base that will keep oils from festering on the skin and smudging intense colors. Cover with foundation or powder to set.
2. Use a Highlighting eyeshadow stick in a light pearl or flesh color (try Make Up For Ever's Pearly Waterproof Eyeshadow Pencil). This will help to keep the pigments sticking to your eye lid, not falling under your eyes or onto your cheeks. Cover the entire eyelid, up to the brow bone.
3. Apply lighter color eyeshadow with a regular eyeshadow brush to entire eyelid. Layer for desired intensity (I used L'oreal HIP's bright yellow in the eyeshadow duo 'Striking').
4. Use a lighter color (I used white for the yellow) just in the inside corner of the eyes. Blend with the first color to give depth to the eye.
5. Take your darker color (I used Make Up For Ever's Black eyeshadow) and apply to the crease of the eye, starting from the outside corner. I used my smudging brush to do this, as the bristles are shorter and it won't blend as much with the lighter color. Fill the outside corner, and bring 3/4 of the way to the inside corner of the eye. By leaving this little section open, your eyes appear larger. For a very dramatic look, bring to the inside corner. Bring slightly up on the corners of the eye.
6. Apply your liner to upper eyelid, as close as you can to your lashes, from inside corner to outside corner. I used my favorite Studio Gear cake eyeliner in black with my lining brush. Line the bottom lashes halfway to the corner of your eye (I line mine up with my pupil) and smudge out using the black eyeliner and your smudge brush.
7. Apply two coats of black mascara to top lashes. I applied one coat to my bottom lashes as well.
8. If your darker color is uneven on your eyes, you can always reshape using one of my favorite tricks: wet a q-tip, put some soap on it, and squeeze the excess water out. This can be used as an eraser for dark colors. (Be careful!) Once the cotton has the pigment on it you will need to either use another area of clean cotton or use the other side, otherwise it will put the pigment where you don't want it. Fix up your dark color to make both eyes look even.
9. Apply a shimmering highlighting powder (I used gold) with your fingertip right above where the dark color ends. Bring this up to your brow. This will lighten up your eyes and allow for perfect pictures!
You're ready for your close up!
Try these steps out and let me see how your bright, flashy colors come out!
And as always, Let's go Pens!
There are many different ways for people to show their team spirit...whether it be through wearing jerseys, temporary tattoos (or real ones, for that matter) and even painting their faces. Check out Pensburgh for the best Penguins hockey and fan news!
Today I not only wore my favorite player's jersey, but got my make up working too. No reason why tomboy's can't be pretty, too! By using L'oreal's High Intensity Pigment eyeshadows, I rocked my yellow and black, and showed my true team spirit!
To get this look (or any other with deep pigmentation):
1. Start with a makeup base that will keep oils from festering on the skin and smudging intense colors. Cover with foundation or powder to set.
2. Use a Highlighting eyeshadow stick in a light pearl or flesh color (try Make Up For Ever's Pearly Waterproof Eyeshadow Pencil). This will help to keep the pigments sticking to your eye lid, not falling under your eyes or onto your cheeks. Cover the entire eyelid, up to the brow bone.
3. Apply lighter color eyeshadow with a regular eyeshadow brush to entire eyelid. Layer for desired intensity (I used L'oreal HIP's bright yellow in the eyeshadow duo 'Striking').
4. Use a lighter color (I used white for the yellow) just in the inside corner of the eyes. Blend with the first color to give depth to the eye.
5. Take your darker color (I used Make Up For Ever's Black eyeshadow) and apply to the crease of the eye, starting from the outside corner. I used my smudging brush to do this, as the bristles are shorter and it won't blend as much with the lighter color. Fill the outside corner, and bring 3/4 of the way to the inside corner of the eye. By leaving this little section open, your eyes appear larger. For a very dramatic look, bring to the inside corner. Bring slightly up on the corners of the eye.
6. Apply your liner to upper eyelid, as close as you can to your lashes, from inside corner to outside corner. I used my favorite Studio Gear cake eyeliner in black with my lining brush. Line the bottom lashes halfway to the corner of your eye (I line mine up with my pupil) and smudge out using the black eyeliner and your smudge brush.
7. Apply two coats of black mascara to top lashes. I applied one coat to my bottom lashes as well.
8. If your darker color is uneven on your eyes, you can always reshape using one of my favorite tricks: wet a q-tip, put some soap on it, and squeeze the excess water out. This can be used as an eraser for dark colors. (Be careful!) Once the cotton has the pigment on it you will need to either use another area of clean cotton or use the other side, otherwise it will put the pigment where you don't want it. Fix up your dark color to make both eyes look even.
9. Apply a shimmering highlighting powder (I used gold) with your fingertip right above where the dark color ends. Bring this up to your brow. This will lighten up your eyes and allow for perfect pictures!
You're ready for your close up!
Try these steps out and let me see how your bright, flashy colors come out!
And as always, Let's go Pens!
Wednesday, March 3, 2010
Studio Gear Cake Eyeliner - Perfect Lines Every Time!
Hi Friends!
Nothing makes me more aggrivated than getting my eyeshadow to look just right - fading each color perfectly into the next, and experimenting with new hues that lead to an awesome look. Then...it happens. I go to put my eye liner on and something horrible happens. I put my line on too thick. It doesn't come out dark enough, leading me to retrace my brush stroke, waste time and possibly smear. My dog barks out of nowhere and I draw a line halfway up my face (I'm too familiar with this one).
Cake eyeliner can help nip these problems in the butt. Similar to a eyeshadow, this product is designed to give the user ultimate control over how their liner goes on. When using this type of liner, it's always a good idea to wet your brush with water before applying the product to the brush. This will keep all bristles on your brush in place, minimize flakng and smudging, and allow for a cleaner line. Paired with a great angled liner brush, the lines you desire become easier to define, width is completely controlled, and it stays on all day!
Eyeliner sticks and pencils have their benefits, such as being able to get into the lid areas of the eyes to define your eye's shape, but they may not provide the thin, clean line you desire. I've experimented with many different types of cake and gel eyeliners, including MAC's black cake eyeliner and HIP Cosmetic's black cream eyeliner. Nothing seemed to get the job done. I felt I had to dig into the MAC cake to get anything onto my brush, and the HIP eyeliner disappeared from my face by the end of the day.
On a trip to ULTA recently, I picked up Studio Gear's Cake Eyeliner in black, and instantly fell in love. Studio Gear is a brand that is all encompassing. From skincare to primers, brushes and foundation - they have it all. It may not be the best known brand, but from my experience so far, they SHOULD be!
This cake eyeliner looked almost like a black shadow when I opened it, so I was afraid I'd have a bad experience like I'd had in the past...flaking off into my poor contact-irritated eyes throughout the day or coming out as a dark grey hue instead of black. I wet my brush, tapped out excess water, and swirled it around the pan. The powder quickly became a beautifully usable liquid, instantly making something inside of me become excited about applying.
Much to my surprise, my lines came out perfect on the first application. In the hopes for a very thin line, I pushed right up against my upper lash line with my favorite angled brush. The line was so thin I could barely see any excess on my eyelid at all. I applied my mascara, and my eyes truly popped! The nice, clean lines and uninterrupted eyeshadow I acheived was a fantasy for a perfectionist like myself.
If you're looking for a smudged or smoky eye, Studio Gear cake eyeliner can help you acheive this as well! The clean line I've mastered is now a staple of mine, even if I am trying to get a different look. After lining my eyes as usual, I simply take a smudging brush and apply either the cake eyeliner or black shadow to it, tap it out, and smudge away. The clean line that was acheived before smudging will stay in place over your lash line, no matter what you do over it. Also, getting such a dark color that close to your lash line will allow for perfect definition and make your lashes look thicker after mascara.
Cake eyeliner isn't used as much as I think it should be, and I can't figure out why that is. Even makeup artist friends and coworkers of mine stick with the sticks. I suggest you try it out, you have no idea what you're missing out on!
Studio Gear products are available from ULTA, Macy's and Dillard's. They can also be found on their website, StudioGear.
Have any questions about applying, choosing, or working with cake eyeliner? Let me know! Have you ever experimented with any types of liners other than sticks?
Nothing makes me more aggrivated than getting my eyeshadow to look just right - fading each color perfectly into the next, and experimenting with new hues that lead to an awesome look. Then...it happens. I go to put my eye liner on and something horrible happens. I put my line on too thick. It doesn't come out dark enough, leading me to retrace my brush stroke, waste time and possibly smear. My dog barks out of nowhere and I draw a line halfway up my face (I'm too familiar with this one).
Cake eyeliner can help nip these problems in the butt. Similar to a eyeshadow, this product is designed to give the user ultimate control over how their liner goes on. When using this type of liner, it's always a good idea to wet your brush with water before applying the product to the brush. This will keep all bristles on your brush in place, minimize flakng and smudging, and allow for a cleaner line. Paired with a great angled liner brush, the lines you desire become easier to define, width is completely controlled, and it stays on all day!
Eyeliner sticks and pencils have their benefits, such as being able to get into the lid areas of the eyes to define your eye's shape, but they may not provide the thin, clean line you desire. I've experimented with many different types of cake and gel eyeliners, including MAC's black cake eyeliner and HIP Cosmetic's black cream eyeliner. Nothing seemed to get the job done. I felt I had to dig into the MAC cake to get anything onto my brush, and the HIP eyeliner disappeared from my face by the end of the day.
On a trip to ULTA recently, I picked up Studio Gear's Cake Eyeliner in black, and instantly fell in love. Studio Gear is a brand that is all encompassing. From skincare to primers, brushes and foundation - they have it all. It may not be the best known brand, but from my experience so far, they SHOULD be!
This cake eyeliner looked almost like a black shadow when I opened it, so I was afraid I'd have a bad experience like I'd had in the past...flaking off into my poor contact-irritated eyes throughout the day or coming out as a dark grey hue instead of black. I wet my brush, tapped out excess water, and swirled it around the pan. The powder quickly became a beautifully usable liquid, instantly making something inside of me become excited about applying.
Much to my surprise, my lines came out perfect on the first application. In the hopes for a very thin line, I pushed right up against my upper lash line with my favorite angled brush. The line was so thin I could barely see any excess on my eyelid at all. I applied my mascara, and my eyes truly popped! The nice, clean lines and uninterrupted eyeshadow I acheived was a fantasy for a perfectionist like myself.
If you're looking for a smudged or smoky eye, Studio Gear cake eyeliner can help you acheive this as well! The clean line I've mastered is now a staple of mine, even if I am trying to get a different look. After lining my eyes as usual, I simply take a smudging brush and apply either the cake eyeliner or black shadow to it, tap it out, and smudge away. The clean line that was acheived before smudging will stay in place over your lash line, no matter what you do over it. Also, getting such a dark color that close to your lash line will allow for perfect definition and make your lashes look thicker after mascara.
Cake eyeliner isn't used as much as I think it should be, and I can't figure out why that is. Even makeup artist friends and coworkers of mine stick with the sticks. I suggest you try it out, you have no idea what you're missing out on!
Studio Gear products are available from ULTA, Macy's and Dillard's. They can also be found on their website, StudioGear.
Have any questions about applying, choosing, or working with cake eyeliner? Let me know! Have you ever experimented with any types of liners other than sticks?
Monday, March 1, 2010
Modelco Face Base Skin Primer - Can't Live Without It!
Hope everyone's day was great!
Today I wanted to write about one of my favorite products EVER, something I cannot start my daily makeup routine without - Modelco Face Base Skin Primer. This silky, hydrating primer has been my go-to product for over a year, and I don't think I could ever be swayed away from it.
Modelco is a great cosmetic and self-tanning brand from Australia, who's products never cease to amaze me. Their Tan In A Can self tanner is a legendary product, and is available from places such as Henri Bendel and Ulta. I've worked for a distributor who sells Modelco in the United States for about a year, and Face Base has always been one of my favorites.
 Face Base is oil free, contains vitamins C and E, and is a moisturizer all in one. It's clear formula allows even application, and a little bit goes a long way! This amazing gel fills in wrinkles and open pores, giving foundation a flawless face to glide over. Just rinse your face before application, wait two minutes for it to set before applying your makeup, and your beautiful face will look the same after a hard day's work (or long night of dancing) as it did when you first left your house.
I put this product over my entire face, eye lids, lips, and down under my chin. Face Base will keep bronzer on your cheeks, eyeshadow on your lids, and lipstick from bleeding onto your skin. I have very large, open pores around my nose and upper cheeks, and this primer keeps my foundation from sinking into those gaping holes.
I've had lots of problems with acne in the past, and I feel that using this product over my day cream, my skin has been almost completely breakout free. By creating a boundary between your open pores and your foundation/concealer, you have less of a chance of clogging them with dirt.
My favorite thing about Face Base, however, is how it keeps my eye makeup in place. I touch my face incessantly throughout the day, despite attempts to stop this horrible habit. I rub my eyes, itch my eyebrows, whatever my brain may ask of me, and I still seem to look great after a long day. Face Base even keeps my eye makeup on after working up a sweat in the gym!
Modelco products are available from Modelco USA. Face Base is 45 mL and runs for $34, and will last you about three months per bottle (depending on usage, of course).
Have you ever tried any Modelco products?
Image courtesy of Modelco USA.
Today I wanted to write about one of my favorite products EVER, something I cannot start my daily makeup routine without - Modelco Face Base Skin Primer. This silky, hydrating primer has been my go-to product for over a year, and I don't think I could ever be swayed away from it.
Modelco is a great cosmetic and self-tanning brand from Australia, who's products never cease to amaze me. Their Tan In A Can self tanner is a legendary product, and is available from places such as Henri Bendel and Ulta. I've worked for a distributor who sells Modelco in the United States for about a year, and Face Base has always been one of my favorites.
 Face Base is oil free, contains vitamins C and E, and is a moisturizer all in one. It's clear formula allows even application, and a little bit goes a long way! This amazing gel fills in wrinkles and open pores, giving foundation a flawless face to glide over. Just rinse your face before application, wait two minutes for it to set before applying your makeup, and your beautiful face will look the same after a hard day's work (or long night of dancing) as it did when you first left your house.
I put this product over my entire face, eye lids, lips, and down under my chin. Face Base will keep bronzer on your cheeks, eyeshadow on your lids, and lipstick from bleeding onto your skin. I have very large, open pores around my nose and upper cheeks, and this primer keeps my foundation from sinking into those gaping holes.
I've had lots of problems with acne in the past, and I feel that using this product over my day cream, my skin has been almost completely breakout free. By creating a boundary between your open pores and your foundation/concealer, you have less of a chance of clogging them with dirt.
My favorite thing about Face Base, however, is how it keeps my eye makeup in place. I touch my face incessantly throughout the day, despite attempts to stop this horrible habit. I rub my eyes, itch my eyebrows, whatever my brain may ask of me, and I still seem to look great after a long day. Face Base even keeps my eye makeup on after working up a sweat in the gym!
Modelco products are available from Modelco USA. Face Base is 45 mL and runs for $34, and will last you about three months per bottle (depending on usage, of course).
Have you ever tried any Modelco products?
Image courtesy of Modelco USA.
Subscribe to:
Posts (Atom)